My next guest up in the
Baking with Heritage series is Lisa of
Parsley, Sage and Sweet with a twist on her Grandmother's challah. I know Lisa to be a conscientious food blogger with the highest integrity, but I didn't expect her to even outdo herself. All, and I mean without exception, of her posts are of the highest quality.
I have posted
challahs in the past, always meant to go behind the scenes into the history of the bread but never got around to it. Lisa here is touching the subject and then some. Interwoven with smart writing and few chuckles when least expected. I've known Lisa to be a phenomenal baker and just from my email exchanges with her, I understood her language skills are something to be aspired to. Not to mention her epic photographs below.
Lisa has many variations on Challah on her site, what intrigued me the most was the
Salted Caramel Apple Sourdough Challah. You would also enjoy her
Parlet-Vous Croissant? Gosh it's so flaky! Lastly, a non yeast creation, you can only find in Patisseries and at Chez Lisa's,
Biscuit Joconde Imprime/Entremet - Peanut Butter and Chocolate all Decked Out.
Hello, everyone. My name is Lisa and I'm the 'talker' and picture taker behind the blog Parsley, Sage and Sweet. When Shulie asked if I would like to take part in her Baking with Heritage series, I was incredibly flattered. I've admired Shulie and Food Wanderings for some time now, so I'm honored (and humbled) that someone so talented would think of me for a guest post.
After sifting through my paternal grandmother's recipe box several times, I knew exactly what I wanted to bake and talk about - challah, and a twist on my grandmother's challah recipe. The recipe traveled from Russia to America, and has been indelibly woven into my life in so many ways - from preparation to family to love and sparkling memories - traditions I try to carry on.
I can't remember a time in my life when there wasn't challah. Both of my grandmothers used to make it every holiday, barring Passover, of course. My paternal great-grandparents emigrated from Russia to the US in the early 1900's, as did my maternal grandmother's family, albeit a little later. In both families, challah making was passed down from generation to generation, mother to daughter, except in the case of my mother, who hated/hates baking. So, being the first grandchild, and female, considering my paternal grandmother was
blessed with two boys who had as much interest in baking as Henry Kissinger did in stand-up comedy, I was to be the next in line.
Before I continue - a brief history on challah. There are so many different interpretations of the origin, meaning and how it came to be called 'challah’, so I'm just going to tell you the bits that I recall, in laymans terms, learned from several people and a little internet research. Around the 15th Century, Ashkenazi (Eastern European) Jews began braiding their usual round or basic loaves for Shabbat, possibly emulating the fancy, twisted white breads throughout other parts of Europe. The braids came to symbolize entwined arms representing love, unity, and the commandments to remember, observe and guard the Shabbat.
The challah is eaten on Sabbath to represent the manna that G-d dropped from the heavens to feed the Israelites during their 40 years in the dessert after their Exodus from Egypt. On Friday night, two loaves are served, because the day before the Sabbath, G-d gave a double portion of manna so the Sabbath could be a day of rest for him. It's
also said that the two loaves served should be 6-braid loaves, 12 braids commemorating the 12 tribes of Israelites.
The term,
challah, is believed to come from the biblical commandment of ‘hafrashat challah’ which is the mitzvah of separating a portion of the dough (
challah) before braiding to set aside as a tithe for the priests in the Temple. After the destruction of the Temple, the mitzvah was fulfilled by burning the separated dough in remembrance of the destruction - a symbolic sacrifice. Years later, the Ashkenazi Jews began to refer to the whole bread, rather than the portion of dough separated and burned, as
challah.

I learned the secret to this lovely, burnished braid from my paternal grandmother. When I was very small, I loved watching her (and occasionally her three sisters, bantering and bickering) knead the dough, then cut it into anywhere from 3 to 6 pieces, depending on the occasion, since a 6-braid challah was usually for holidays or large family gatherings - mostly to impress. She would roll each piece into long snakes, tapering the ends - which is the first 'skill' she taught me, my tiny hands perfect for the job. I was in awe of her braiding skills. She could 6-braid a challah in mere seconds. I used to liken her speedy braiding to the Roadrunner. That always got a chuckle out of her.
As the years went by, her hands slightly gnarled from arthritis, she still managed to turn out braids in seconds. Unfortunately, I never learned the 6-braid challah from her because, although I loved baking and watching her, as I got older, I was more interested in boys than braiding and was too distracted to really focus and get it right. I eventually did learn how to 6-braid a challah, from a tutorial on the internet. I admit, this saddens me, but I'm pretty good at it (though not as fast), so I attribute any skills I have to her.
At home, challah was a staple at our dinner table and not just for the Sabbath. We loved it so much, we'd plead for it many an early morning while getting ready for school. Since my mother didn't bake, it was always a treat to come home and see the familiar white paper bag from a local bakery on the counter. We never cut into it with a bread knife, or any knife for that matter, instead we tore pieces off with reckless abandon. My father used to call it 'the old-fashioned way' from the
old country, which I thought to be an excuse for our challah savagery.
But, I was soon to learn that tearing, rather than cutting challah, is tradition, since a knife can represent violence, which should never infringe on the peace of Sabbath.
On a side note - The
old country was a fictional country my father made up and told us wacky tales about. It had a name, but I'm afraid my father might revoke my place in line to the throne, if I reveal it.
The challah you see here is based on a loaf my grandmother used to make for my father, and since it did not involve braiding, the first loaf I actually made with her, step-by-step, one Rosh Hashanah when I was about 6 yrs old. My father loved cinnamon raisin bread, so she began adding cinnamon sugar to the round raisin challah she made every Rosh Hashanah, from the time he was a child. She would knead the raisins into the dough, then roll the dough into a large rectangle, brush it lightly with margarine, and sprinkle on lots of cinnamon sugar.
The rectangle was rolled tightly, twisted a few times, then coiled into a greased cake pan, brushed with a double coating of egg wash and baked. The round shape was not only for Rosh Hashanah, but it was also to distinguish it from the basic braided challahs at other holiday and family gatherings, since she
always made this loaf for him when she was making challah.
Over the years, I've remained staunchly faithful to her challah recipe, until this loaf. I felt this special loaf she made for my father wouldn't hurt with a change here and there - beginning with the raisins. I love cinnamon raisin bagels and cinnamon raisin breads, but I don't love, or even
like, raisins in challah. I can't explain why, so I won't.
I replaced the oil with browned butter infused with vanilla bean. In a traditional challah recipe there is no dairy, so the bread can be eaten with meat in kosher homes. My
twist is more of a breakfast, dessert or snack challah - a challah that would pair well with coffee or tea. I highly doubt anyone would want to serve it with meat or any savory meal, but if you keep kosher and are uncomfortable with this in any way, infuse melted margarine with the vanilla.
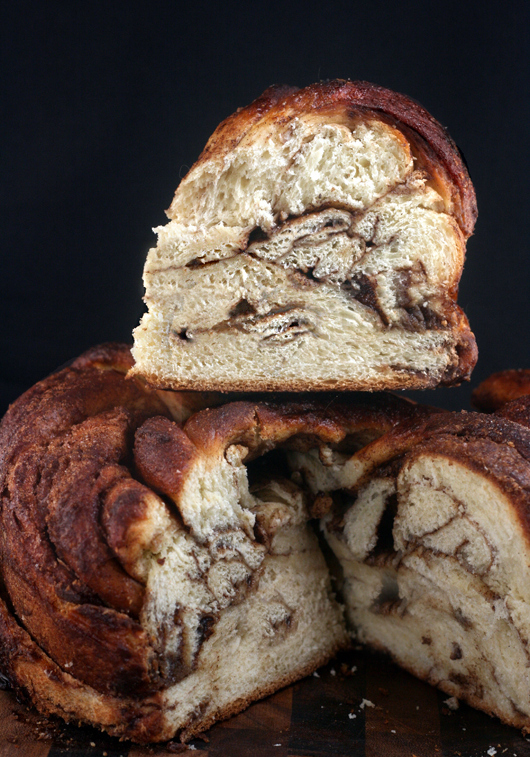
The last change I made was using brown sugar in the filling for a deeper, richer flavor and gooey texture - similar to a cinnamon roll. I barely egg washed this loaf because of the open strips of cinnamon-brown sugar on top - just a light wash on the risen strips of solid, risen dough. However, the cinnamon-brown sugar caramelized beautifully..aiding in the lovely burnished color associated with challah.
Once baked, cooled and sliced (or torn), the layers pull apart beautifully, with hidden pockets of cinnamon goo and toasty butter, plus a slight essence of vanilla throughout the whole loaf.

The directions for this challah are by hand, the way my grandmother made it, but of course you can use your stand mixer or the dough cycle on your bread machine, following the manufacturer's instructions (the order in which the ingredients are placed in the machine before mixing and kneading).
Vanilla Bean Brown Butter Cinnamon Swirl Challah
1 package (2 1/4 teaspoons) active dry yeast
1 cup tepid water
1/4 cup sugar
4 to 5 cups bread flour
2 eggs plus 1 egg yolk
1 vanilla bean, split and scraped
10 tablespoons (1 stick plus 2 tablespoons) unsalted butter, browned (6 tablespoons in the dough, 4 tablespoons to brush on dough)
2 teaspoons kosher salt
2/3 cup brown sugar
1 tablespoon cinnamon
Egg Wash - 1 egg beaten
DIRECTIONS
1. In a small bowl dissolve the yeast in 1/4 cup tepid water. Cover and let bloom until foamy.
2. While the yeast is blooming,
brown the butter then pour it into a medium bowl. Split the vanilla bean and scrape out the seeds. Stir the seeds into the melted brown butter. Cover with plastic wrap and let it infuse while preparing the dough.
3. Place 1 cup of the flour into a large bowl. Make a hole in the middle of the flour and pour the bloomed yeast into it. Mix the bloomed yeast into some of the flour from the sides of the hole, covering lightly with flour. Place in warm place, covered with towel, for about 15 minutes.
4. When the flour-yeast mixture starts to foam and rise, add the 6 tablespoons of the vanilla bean brown butter, sugar, salt, eggs, the yolk and the remaining 3/4 cup water, then mix until batter like. Slowly start to stir in remaining flour until you get a workable dough. You may or may not use all the flour,
or may need more, depending on many factors, like the weather.
5. Remove the dough from bowl, and knead on a floured board for 10 - 15 minutes until smooth and elastic. Place the dough in a lightly oiled bowl, cover with plastic wrap and a towel and let rise in a warm place for 1 hour or until doubled in size.
6. Combine the cinnamon and brown sugar in a small bowl, cover. and set aside. Grease a 9-inch springform pan.
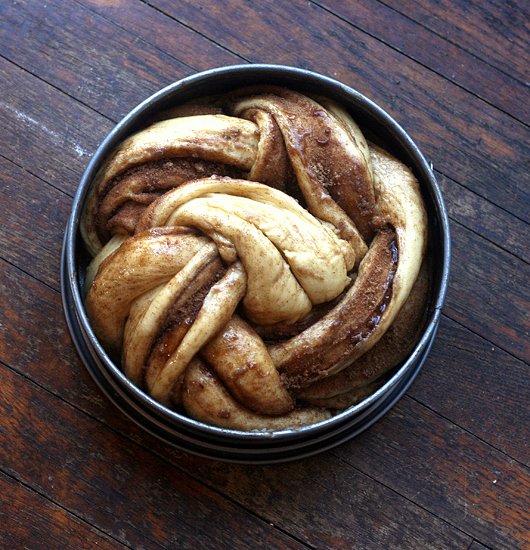
7. When the dough has doubled in size, gently fold the dough onto itself to deflate it. Remove from the dough from the bowl to a floured surface. Roll the dough out into a 20 x 24-inch rectangle, lifting the dough and flouring the board as you go along, if necessary, to prevent sticking (I keep a dough scraper on hand). Brush the surface of the dough with the remaining 4 tablespoons of vanilla bean brown butter (you will have to melt it again - just a few seconds), then sprinkle evenly with all of the brown sugar-cinnamon mixture..lightly pressing it into the dough, then patting it down.
8. Roll the dough up, tightly, from the 24-inch side. Seal the ends and seams. Slice the roll in half vertically (some sugar and cinnamon will fall out, don't worry about it) and immediately twist both halves together. Coil the twist into a greased 9-inch springform pan, starting in the center of the pan and wrapping it around that center. Cover with lightly greased plastic wrap and let rise in a warm place until doubled in size. 15 to 20 minutes before it's ready to bake, preheat the oven to 350 degrees Fahrenheit.
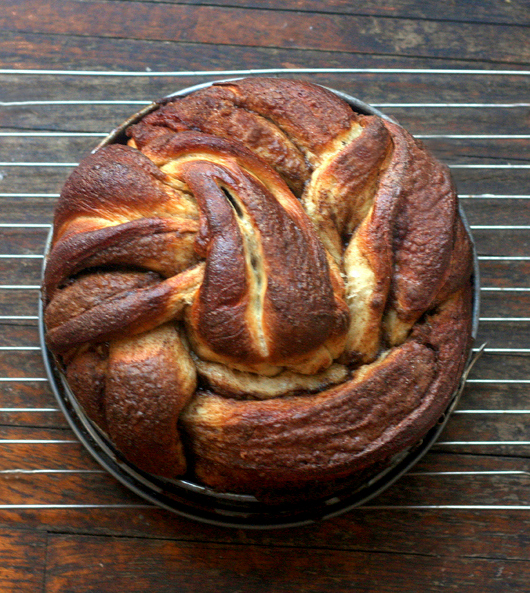
9. Brush the strips of solid dough on top with egg wash, being careful not to brush the open strips of cinnamon sugar. Place the springform pan on a baking sheet on the middle rack of the oven. Bake for 35 to 45 minutes until a deep, golden brown (the brown sugar caramelizes, so keep an eye on it the last 10 minutes)
10. Let the challah cool in the pan for 10-15 minutes, then run an offset spatula or the back of a knife around the challah to insure it releases cleanly. Place the loaf on a wire rack to cool completely before slicing (this is very hard to do - we usually start pulling it apart while still warm).
Thanks again to Shulie for inviting me to write this post for Baking with Heritage. I hope you all try and enjoy this challah!
Baking with Heritage series:
A Romanian Flatbread with Roasted Tomatoes
An Argentinian Tortitas Negras - Little Black Cakes
If you would like to be a guest in this Baking with Heritage series please feel free to contact me.


